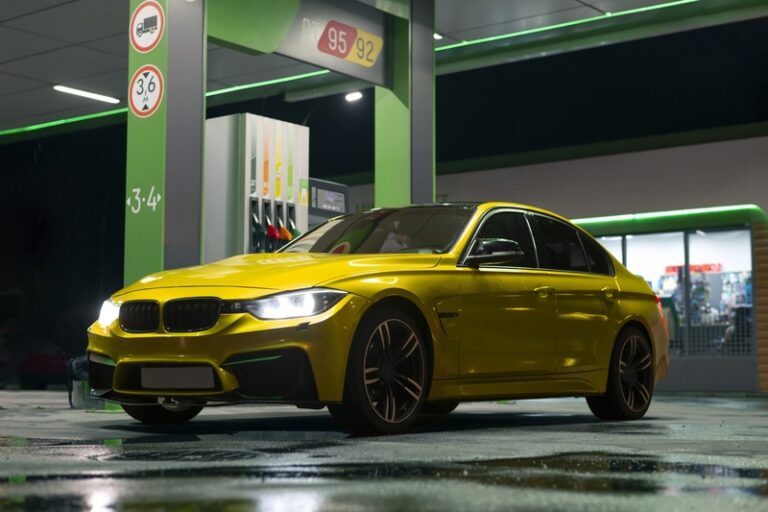
Ever wondered how to edit car photos in Lightroom? Looking to take your car photography to the next level with professional-quality edits? Lightroom is packed with features that can transform any car photo from ordinary to extraordinary.
You can use Adobe Lightroom to enhance reflections, perfect metallic tones, and correct colors, Lightroom has everything you need. It’s also great for editing car photos for a dealership, your portfolio, or just for fun.
In this guide, I’ll show you step-by-step how to edit car photos in Lightroom. By the end, you’ll feel confident creating polished and professional-looking car images. So, grab your favorite car photo, and let’s dive in!
Why Edit Car Photos in Lightroom?
If you’ve ever asked, “Why should I bother editing car photos in Adobe Lightroom?” let me break it down for you:
Here’s what makes Lightroom stand out for car photo editing:
- Easy-to-use sliders: Adobe Lightroom’s sliders let you control everything. You can adjust brightness, contrast, colors, and sharpness. You can do all these things without needing advanced skills.
- Reflections and metallic finishes: Cars reflect everything around them, and Lightroom’s tools help you enhance those reflections beautifully.
- Quick presets: Want fast results? Lightroom has presets that let you achieve professional edits in seconds.
Lightroom simplifies the process and makes your car photos look stunning. It’s great for beginner and someone with some experience,
Why This Matters
High-quality edits can make your car photos more eye-catching. You can upload them to social media, sell a vehicle online, and build your portfolio.
Learning how to edit car photos in Lightroom will save you a lot of time. It will always give incredible results.
Pro Tip:
Watch this video to help you get started if you are new to Lightroom.
Pre-Editing Tips for Car Photos
It’s essential to set the foundation for great edits before jumping into Adobe Lightroom. Editing becomes much easier when you start with high-quality photos and a well-organized workspace.
Choose the Right Photo
Start with a high-resolution image to retain maximum detail during editing. It’s also important to shoot in good lighting conditions.
Overcast days are great for car photography. Because they reduce harsh shadows and reflections. Try positioning the car to avoid unwanted glare if you’re shooting in bright sunlight.
Here are a few tips according to expert photographers:
- Use a DSLR or mirrorless camera for the best results.
- Capture multiple angles so you have options to choose from.
- Shoot in RAW format to retain more detail for editing.
Pro Tip:
For more car photography tips, check out this article on car photo shoot setups.
Organize Your Files in Lightroom
Import them into Adobe Lightroom once you’ve selected your photos. A well-organized workspace can save you hours of frustration.
- Importing Photos:
Drag and drop your car photos into Lightroom’s Library module. You can sort them into folders from there.
- Create Collections:
Group similar shots, like front angles, interiors, or close-ups, into collections for easier access.
- Add Keywords:
Tag your photos with keywords like “car side view” or “sports car interior” to find them quickly later.
Pro Tip:
Learn more about file management and Lightroom organization in this helpful guide.
Now that your photos are ready to go it’s time to dive into the fun part—editing!
In the next section, we’ll cover the basics, including how to adjust exposure, contrast, highlights, and more. This step is the most important for creating a solid foundation for your edits.
Ready? Let’s start by mastering the basics of how to edit car photos in Lightroom!
Steps to Edit Car Photos in Lightroom
Step 1 – Adjust Basic Settings
The Basic Panel is the perfect place to start when learning how to edit car photos in Lightroom. It’s where you lay the foundation for your edits by adjusting brightness, contrast, and other essential settings.
Let’s walk through the key tools in this panel.
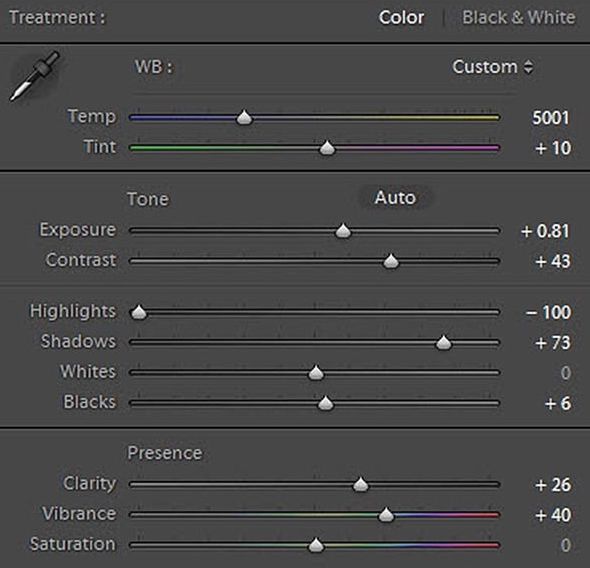
Exposure
Think of exposure as the brightness of your photo. Too bright, and you’ll lose details; too dark, and the image will look muddy. Use the Exposure slider to balance the lighting so the car and background are evenly lit. You should tart small. Because moving the slider too far in either direction can ruin the image.
Contrast
The Contrast slider helps make the car pop by deepening the differences between light and dark areas. Increasing contrast can enhance the car’s edges and make it stand out. I find that a moderate increase often works best for car photos.
Highlights and Shadows
This is where you bring out the details in the reflections on the car and the darker areas. Such as the tires or undercarriage. Lowering the Highlights slider reduces glare from reflective surfaces. On the other hand increasing the Shadows slider adds visibility to darker areas.
Whites and Blacks
Adjusting the Whites and Blacks sliders can help you get a clean and polished look. Slide Whites up to add brightness without overexposing. Then bring Blacks down slightly to create depth and definition.
Pro Tip
Not sure where to begin? Click the Auto Settings button in Lightroom’s Basic Panel. It provides a great starting point. You can tweak it to fit your style.
Need more help mastering Lightroom’s basics? Check out this basic panel tutorial for additional insights:
Step 2 – Correct the Colors
Color correction is key when editing car photos. A car’s paint job should look vibrant yet natural. Lightroom’s White Balance and HSL Panel make this easy.
White Balance
White Balance affects the overall tone of the image. Use the Temperature slider to make warm colors richer or cool tones sharper.
I often set the White Balance to “As Shot” and adjust slightly to ensure the car paint and surrounding colors look realistic.
HSL Panel
The HSL Panel (Hue, Saturation, and Luminance) is great for perfecting car colors.
- Hue: You can adjust hues to refine car paint tones or tweak the sky for a clean backdrop.
- Saturation: Boost reds for brake lights or blues for the sky to make them pop.
- Luminance: You can use this to lighten or darken specific colors. Such as making the sky softer or the car paint brighter.
Color Grading
Tthe Color Grading tool lets you adjust the highlights, midtones, and shadows. This is great for adding a unique vibe.
This can create a cinematic look. It also adds a distinct mood to your car photo. For example, adding a slight blue tone to the shadows gives a cool and modern feel.
Looking for tips on working with colors? This HSL adjustments Lightroom guide has got you covered.
Step 3 – Enhance the Details
Once the colors are on point, it’s time to bring out the details. Lightroom’s tools for Clarity, Texture, and Sharpening make your car look sharper and more polished.
Clarity
The Clarity slider adds depth by emphasizing edges and textures. Increasing clarity can make the car’s contours, grilles, and trims look sharper.
Be careful not to overdo it. Because it can make the image look unnatural.
Texture
This tool enhances fine details without affecting the contrast. Use it to highlight features like the car’s paint texture or tire treads. I usually add just a touch for a realistic finish.
Sharpening
Sharpening is the final touch for defining intricate parts like headlights, badges, or rims. In the Detail Panel, you need to increase the Amount slider while holding down Alt (or Option) to preview the sharpening effect.
Adjust Radius and Detail to suit your image. This will keep it clean and crisp.
Want more sharpening tips? This Lightroom clarity tool guide offers practical advice for perfecting your edits.
Now your car photo’s brightness, colors, and details should look sharp. Be ready for the next steps.
In the following section, we’ll fine-tune the finishing touches. I will walk you through the steps for cropping and adding creative effects. Let’s keep going!
Step 4 – Remove Distractions
Distractions in the background or on the car can take attention away from your photo. Lightroom offers some great tools to clean things up. It keeps your edits looking natural.
Here’s how to handle this step when learning how to edit car photos in Lightroom.
Spot Removal Tool
The Spot Removal Tool is perfect for removing dust, scratches, or minor imperfections on the car. Click on the tool, then paint over the distracting spots.
Lightroom will automatically replace those areas with a similar texture to the surrounding image. It’s also great for cleaning up unwanted objects in the background. Such as stray branches or debris.
Crop and Straighten
Cropping and straightening your image helps frame the car better and removes any unnecessary elements on the edges. I always recommend using Lightroom’s Rule of Thirds grid to compose the shot dynamically.
Straightening makes your photo feel tilted. You can just drag the angle slider or use the auto-straighten option for quick fixes.
Masking Tools
Lightroom’s Masking Tools let you make selective edits to specific areas of the photo. You can isolate the car to adjust exposure or color without affecting the background.
Want that professional blurred background effect? Use the Radial Gradient or Brush Tool to soften the surroundings. This also makes the car the focal point.
Need more tips on distractions? Check out this spot healing for cars guide to learn how to clean up your photos.
Step 5 – Add Creative Touches
By now your car photo should look clean and sharp. It’s time to get creative! This step can transform your edits from basic to stunning.
Applying Presets
Presets are the easiest way to apply a consistent look to your car photos. Many photographers create presets specifically for car photography.
These focus on things like dramatic contrasts or vibrant colors. You can find free and premium presets online. Just apply one, then tweak it to suit your image.
Light Effects
Adding light effects can make your photo pop. For example, you can use the Brush Tool to brighten headlights slightly or add a warm glow to the car’s surface.
Try creating a sunflare near the car to enhance the overall vibe if you’re editing an outdoor shot.
Split Toning
Split toning is a powerful tool for adding a cinematic touch. You can adjust the color of highlights and shadows to create a mood.
For car photos, I often add cool tones to the shadows and warm tones to the highlights. It gives the image a balanced and dramatic look.
Looking for inspiration? Check out these Lightroom presets for cars to find quick edits that can save you time.
Exporting Your Car Photos
You’ve done all the hard work. Now, let’s make sure your car photos look perfect when shared online or printed. Exporting correctly ensures you don’t lose quality.
File Format
Exporting as JPEG works best for most purposes. Because it balances quality and file size. If you need a higher-quality format for large prints then use PNG.
Resolution Settings
Set the resolution to 300 dpi if you’re planning to print your photo. 72 dpi is fine for web use or sharing on social media.
Always adjust the dimensions to fit the platform. Like 1080×1350 pixels is the most used and suitable size for Instagram posts.
Social Media Tips
Always export your photos in sRGB color space when uploading to social media. This ensures the colors stay consistent on different devices. Also, avoid over-compressing the image to maintain quality.
Want more advice on this? This export settings Lightroom guide breaks it all down step-by-step.
By following these steps, you’ll not only know how to edit car photos in Lightroom but also ensure your work shines wherever it’s displayed.
Try these tips today, and watch your car photography stand out!
Common Mistakes to Avoid While Editing Car Photos
It’s easy to make a few missteps when learning how to edit car photos in Lightroom. These mistakes can negatively impact your results.
Here are the most common mistakes I’ve seen and how you can avoid them.
Over-editing
Over-editing is a trap many fall into. This is very common when they’re starting out. Adding too much clarity, saturation, or contrast can make your car photos look unnatural.
A good rule of thumb is to step back and compare your edit to the original image. If it feels overdone then dial it back a bit.
Ignoring Small Details
It’s tempting to finish quickly and miss important details like reflections on the car windows or imperfections in the tires. Zoom in and check every part of the image.
Areas with intricate elements like grilles or badges are often missed. This attention to detail will make your edits more professional.
Forgetting to Save Your Edits
Imagine spending an hour perfecting a car photo only to lose your progress! Always save your edits by creating snapshots in Lightroom.
Snapshots let you save versions of your work so you can revisit or tweak them later. It’s also a good idea to back up your Lightroom catalog regularly to avoid losing your edits entirely.
Need more guidance? Watch this Lightroom editing mistakes video for detailed solutions to common errors:
Bonus Tips for Professional Car Photo Editing
These bonus tips will help you add a professional touch to your workflow. Apply them while editing if you want to take your car photo editing to the next level,
Use Lightroom Mobile for Quick Edits
Lightroom Mobile is an excellent option for editing on the go. It includes most of the same tools as the desktop version.
You can enhance photos even when you’re not at your computer. I often use it to tweak lighting or colors right after a shoot.
Combine Lightroom with Photoshop
Lightroom and Photoshop work like a dream team for advanced edits. You can send the image to Photoshop for more detailed retouching after making initial adjustments in Lightroom.
You can use Adobe Photoshop for removing complex distractions or adding special effects. This combo is great for professional car photography.
Create Your Own Car Editing Presets
Once you find a style that works for your car photos, save it as a preset. This saves time and ensures consistency in your edits.
For example, you could create presets for different lighting conditions, like sunny days or night shots.
Looking for inspiration? Check out this Lightroom and Photoshop workflow guide for advanced editing techniques.
Conclusion
Lightroom makes editing car photos fun and efficient. You can transform ordinary car images into stunning visuals by following the steps I shared above.
Lightroom gives you all the tools you need for tweaking colors, sharpening details, or adding creative touches.
Now it’s your turn! Grab your car photos, fire up Lightroom, and bring out the pro editor in you.
If you found these tips helpful, share your edited car photos with us in the comment box. I’d love to see what you create!
FAQs For “How to Edit Car Photos in Lightroom”
Can I edit car photos in Lightroom Mobile?
Yes, Lightroom Mobile offers many of the same tools as the desktop version. It’s perfect for quick adjustments like color correction and cropping.
How do I enhance car reflections in Lightroom?
Use the clarity and highlights sliders to make reflections on the car’s surface pop without looking overdone.
What are the best presets for car photography?
Look for presets designed specifically for cars or metallic finishes. These presets usually enhance color, contrast, and reflections to highlight the car’s features.


